Frequently Asked Questions
Most Common
The install instructions can be found here.
No.
In order to function properly, AMBER/Autonomie needs the system’s region to be set to English (United States). This can be done via the Region applet in the Control Panel.


Changing this system setting may require administrator privileges depending on the security policies in place so you may need to contact your IT department for assistance.
Check for the existence of a file named ‘Program’ at the root of the C drive (C:\Program) and if it’s there, delete it.
Note - A Windows account with administrator privileges is required.
-
Click on the ‘Settings’ button located within the Matlab group in the AMBER tab.

-
In the Manage Matlab screen, select a version of Matlab and click the ‘Register’ button.

-
Enter the credentials for an account with administrator privileges.

- Enter the credentials for the account that is registered with Matlab.

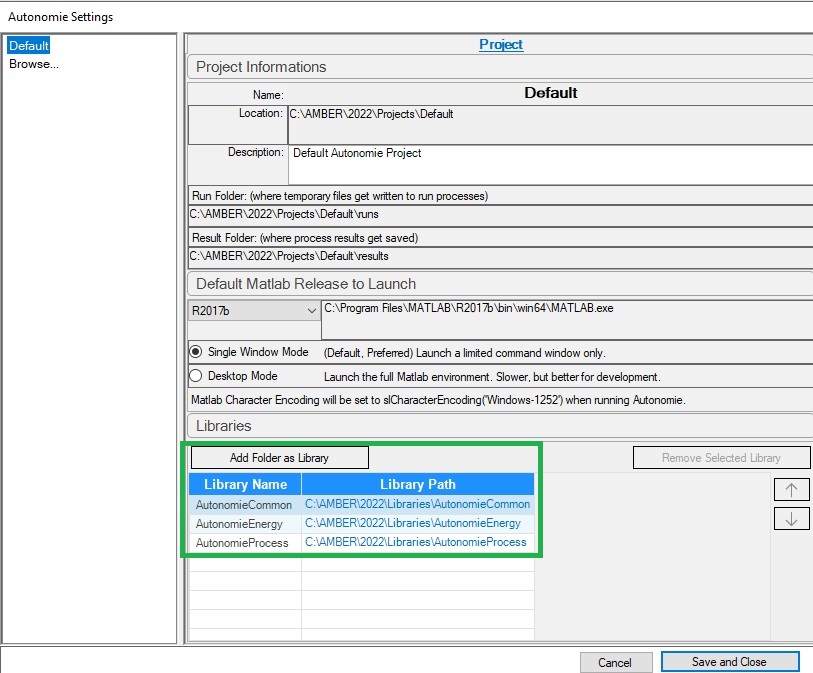
If you don’t see any vehicle in the Autonomie workflows, it’s most likely due to a missing folder in the settings of your Autonomie Project.
Please check that your Autonomie Project includes all the Autonomie Libraries as such:
-
Close all your currently opened workflows
-
Edit the Project setting via the Autonomie menu

-
Check the 3 default Autonomie libraries are included in the project setting, and add any missing ones.
-
Save and close you project setting
-
Open the Run Vehicle workflow, you should now see the vehicles in the GUI.

Figure 1
If an error dialog similar to figure 1 is encountered, perform the following:
-
Close all instances of AMBER.
-
Open Windows Explorer with the path %TEMP%.
Note: Your path will be slightly different than the one depicted in figure 2.

Figure 2
- Locate and delete the ‘dotnetbrowser-chromium’ folder.
- Launch AMBER.
Starting in 2026, Autonomie Lite was merged into the AMBER Express release.
Autonomie Express can now be used for both micro-simulation and powertrain design studies. We are now using the term “Lite” to refer not to compiled models but to simpler backwards models written for quicker estimates. For instance, we now have Autonomie Lite Off-Road.
General Troubleshooting
If AMBER’s splash screen isn’t visible or it’s inaccessible try the following:
-
Turn Off Sticky Keys
- In Windows 10 pull up the start menu and type ’turn off sticky keys’ (see Fig. 1).
- Select the option highlighted in Fig. 1.

- Search for the ‘Use Sticky Keys’ section in the Settings dialog and ensure it’s off (see Fig. 2).

-
Use Task Manager to switch to it
- Open Task Manager.
- Look for the AMBER entry within the Apps group (see Fig. 3). Then expand it and right click on AMBERSplashScreen and then click on ‘Switch to’.

Requires Microsoft Outlook
You can email your log file to support by navigating to the AMBER tab and clicking on the ‘Email Log File’ button within the Help group. An email will be composed in Outlook awaiting for you to send. No other information is sent to support.

Licensing
Troubleshooting A Floating License Server (FLS)
Note - The following procedure assumes the AMBERLicenseServerSetup.pdf document has been completed.
Step #1 - Verify the FLS is installed and running
- Launch the Services App

- Find the FLS entry and verify the status says ‘Running’.

If no entry can be found, install the FLS via the AMBERLicenseServerSetup.pdf document.
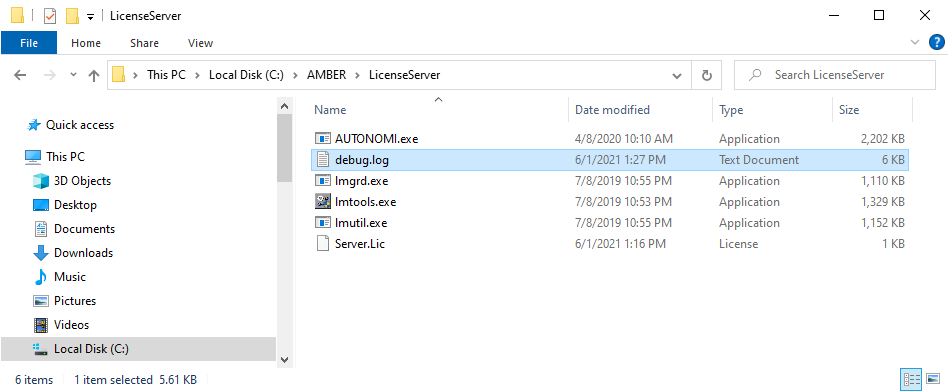
If the status indicates an error, check the FLS’s log file (debug.log) for errors.
Step #2 - Verify AMBER is correctly configured to use the FLS
- Open the License.Lic file located at %AppData%\Argonne National Laboratory\AMBER\Version where Version is the release name (e.g. Beta, 2023, 2024).
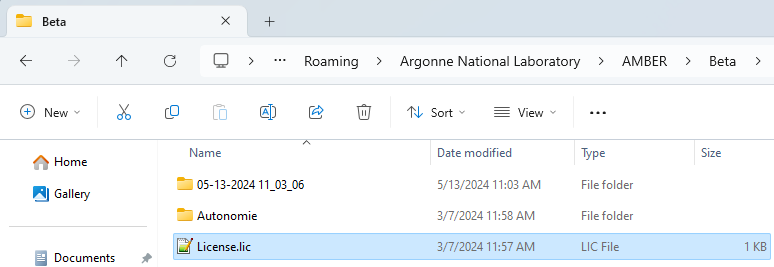
If the FLS name is AMBER-FLS and the port number is 27001 then the contents of the file should be:
SERVER AMBER-FLS 0 27001
USE_SERVER
Step #3 - Verify the computers can communicate with each other
- On the computer that’s running AMBER, open a command prompt and type ping followed by the name of the computer that’s running the FLS.
If the FLS name is AMBER-FLS it should be:
ping AMBER-FLS.

If errors are found it is most likely due to network and/or firewall issues. Machine and network firewalls must allow traffic through the ports used by the license server (default is 27001). Contact your IT Department to troubleshoot these matters.
Step #4 - Email Support
If you’re still having problems email us at [email protected].
In the email attach the following:
- Zip up the entire contents of the FLS directory (e.g. C:\AMBER\LicenseServer).
- Zip up the entire contents of the %AppData%\Argonne National Laboratory\AMBER\Version directory where Version is the release name (e.g. Beta, 2023, 2024).
Perform the following steps:
-
Hold down the
Ctrl&Shiftkeys and launch AMBER by double-clicking its icon on the desktop (see Fig. 1).
-
Once AMBER’s splash screen (see Fig. 2) is visible, you can release the
Ctrl&Shiftkeys and proceed to enter option2(Manage Licenses).
Note - If it seems that AMBER isn’t responding to the keyboard, ensure the splash screen is receiving keyboard input by clicking it.
-
In the Manage Licenses screen (see Fig. 3), select the ‘Diagnostics’ tab to view the data.

Perform the following steps:
-
Copy your license key to the clipboard.
-
Hold down the
Ctrl&Shiftkeys and launch AMBER by double-clicking its icon on the desktop (see Fig. 1). -
Once AMBER’s splash screen (see Fig. 2) is visible, you can release the
Ctrl&Shiftkeys and proceed to enter option2(Manage Licenses).
Note - If it seems that AMBER isn’t responding to the keyboard, ensure the splash screen is receiving keyboard input by clicking it. -
In the Manage Licenses screen (see Fig. 3), check the boxes next to the types that were included with your purchase of AMBER. Then click the ‘Reset’ button.

-
Click the ‘Yes’ button in the Reset Licensing screen (see Fig. 4).

-
Click the ‘OK’ button in the Reset Licensing Success screen (see Fig. 5).

-
Click the ‘Cancel’ button in the Manage Licenses screen (see Fig. 6).
-
Enter your key in the License Activation screen (see Fig. 7) and then click the ‘Activate’ button when you’re finished.

Boot Options
Perform the following steps:
-
Hold down the
Ctrl&Shiftkeys and launch AMBER by double-clicking its icon on the desktop (see Fig. 1). -
Once AMBER’s splash screen (see Fig. 2) is visible, you can release the
Ctrl&Shiftkeys and proceed to enter option5(Purge All).
Note - If it seems that AMBER isn’t responding to the keyboard, ensure the splash screen is receiving keyboard input by clicking it. -
Click the ‘Yes’ button in the Purge All screen (see Fig. 3).

Perform the following steps:
-
Hold down the
Ctrl&Shiftkeys and launch AMBER by double-clicking its icon on the desktop (see Fig. 1). -
Once AMBER’s splash screen (see Fig. 2) is visible, you can release the
Ctrl&Shiftkeys and proceed to enter option3(Reset All Data Sources).
Note - If it seems that AMBER isn’t responding to the keyboard, ensure the splash screen is receiving keyboard input by clicking it. -
Click the ‘Yes’ button in the Reset All Data Sources screen (see Fig. 3).

Note - This applies to AMBER 2024 and later releases.
Perform the following steps:
-
Hold down the
Ctrl&Shiftkeys and launch AMBER by double-clicking its icon on the desktop (see Fig. 1).
-
Once AMBER’s splash screen (see Fig. 2) is visible, you can release the
Ctrl&Shiftkeys and proceed to enter option6(Update).
Note - If it seems that AMBER isn’t responding to the keyboard, ensure the splash screen is receiving keyboard input by clicking it.
-
In the AMBER Update screen (see Fig. 3), click the ‘Patch’ button.

-
Enter the ID of the patch in the Apply Patch dialog (see Fig. 4) and then click the ‘Apply’ button.

-
Click the ‘OK’ button on the AMBER Patch Complete dialog (see Fig. 5).

MATLAB Support
No.
Matlab strings are not compatible with AMBER/Autonomie please use character arrays instead. That is, use single quotes to enclose a string and not double quotes. e.g. use ‘This is a good string’ vs. “This is a bad string”
| Autonomie | Matlab From | Matlab To |
|---|---|---|
| 2026 | R2019a | R2024b |
| 2025 | R2019a | R2024b |
| 2024 U1 | R2019a | R2024a |
| 2024 | R2017a | R2023b |
| 2023 U1 | R2017a | R2023a |
| 2023 | R2017a | R2023a |
| 2022 U2 | R2017a | R2022b |
| 2022 U1 | R2017a | R2022b |
| 2022 | R2017a | R2022a |
| 2021 | R2017a | R2021b |
| 2020 | R2017a | R2020b |
| Rev17 (AMBER 1.0) | R2014a | R2018b |
| Rev16 SP7 | R2014a | R2019b |
| Autonomie Express | Matlab |
|---|---|
| 2026 | R2023b |
| 2025 | R2023b |
| 2024 (All Versions) | R2021b |
| 2023 (All Versions) | R2021b |
| 2022 (All Versions) | R2021b |
| Autonomie Lite | Matlab |
|---|---|
| 2025 | R2023b |
| 2024 (All Versions) | R2023b |
| 2023 (All Versions) | R2018b |
| 2022 (All Versions) | R2018b |
| Aeronomie | Matlab |
|---|---|
| Beta 2026 | R2024b |
| Beta 2025 | R2024b |
| Beta 2024 | R2023b |
| Beta 2023 U1 | R2023a |
| RoadRunner | Matlab From | Matlab To |
|---|---|---|
| Beta 2026 | R2021b | R2024b |
| Beta 2025 | R2021b | R2024b |
| Beta 2024 | R2021b | R2023b |
| Beta | R2021b | R2022b |
Miscellaneous
Uninstalling AMBER can be done via the control panel applet ‘appwiz.cpl’.
appwiz.cpl
The section below shows 3 ways to launch the applet:
-
Control Panel\Uninstall a program

Click on the ‘Uninstall a program’ link and then proceed to the Programs and Features section.
-
Control Panel\Programs and Features

Click on the ‘Uninstall a program’ link and then proceed to the Programs and Features section.
-
The Run Dialog Box Open the Run Dialog Box (⊞ Win+R) and enter ‘appwiz.cpl’ and then click ‘OK’.

Programs and Features
***** Please close all instances of AMBER as well as any open files before proceeding. This will help to ensure a complete and successful uninstall. *****
-
Upon entering Programs and Features, find the AMBER entry, select it and then click the ‘Uninstall/Change’ button.

-
Click the ‘Yes’ button on the AMBER Uninstall dialog and wait until the success or failure dialog is shown.

-
Success

-
Failure
- If any other dialog appears, ensure that all files are closed in the ‘C:\AMBER\[Release]’ and ‘%AppData%\Argonne National Laboratory\AMBER\[Release]’ ([Release] denotes the release name) directories and try again.
-
Yes because it uses HERE Maps and Google Maps.